LinkedIn carousel posts are the BEST way to generate massive engagement and build your following.
They’re also a great way to showcase your expertise and attract new inbound leads.
In this post, I’m going to walk you step-by-step through the exact process I use to create my LinkedIn carousel posts.
By the end, you’ll know how to create your own carousel template that you can reuse again and again to build massive engagement, grow your LinkedIn presence, and generate fresh leads for your business.
I’ve been posting consistently on LinkedIn for over 18 months now. In that short time, I’ve gone from 2,000 stale and inactive followers to a lively audience of over 21,000. Much of that success has come from leveraging LinkedIn carousel posts.
Here’s a snapshot of my top-performing one:

- 115 comments
- 80 reposts
- 485 likes
- 56,809 impressions
- 5 new inbound leads
This carousel netted me over 1000 new followers, tons of visibility, plus several inbound leads for my SEO coaching (here’s the original post on my LinkedIn).
I can’t emphasize this enough: if you want to grow on LinkedIn, you NEED carousel posts in your arsenal.
The good news is – once you know the process, they’re easy to create.
What Are LinkedIn Carousel Posts?
LinkedIn carousel posts are documents shared on LinkedIn in PDF format.
They allow users to easily scroll through the pages of your document without leaving the platform.
The trend for carousel posts is to be colorful and eye-catching, often including fun images, graphs, charts, and bullet points.
This approach makes carousels a pattern interruptor (an effective technique in sales). Carousels stand out from the regular text posts and links most people normally share on LinkedIn.
Carousels are the perfect opportunity to showcase uniqueness and individuality, either for your personal brand or the brand of your business.
Plus, they capture a large chunk of space on your page and hence catch the eyes of your viewers.
Having such a strong focus on graphics gives carousels added power, makes them a lot more engaging, and (critically) makes them extremely shareable.
This ‘shareability’ is what makes carousels the best way to grow (and make money) on LinkedIn. You’ll notice my carousel above received 80 reposts.
The LinkedIn algorithm puts a great deal of importance on reposts (even more than likes or comments).
The logic is that if people are willing to share your content with their own audiences, then it must be top quality. So the algorithm rewards you by showing your carousel to an even wider audience.
In short, the more reposts you get, the faster you’ll grow.
But how exactly do you create a LinkedIn carousel post? I’ll walk you through the steps now. Let’s go!
Creating a Simple Carousel Post: My Exact 7-Step Process
The easiest way to create LinkedIn carousel posts is with my favorite graphic design tool, Canva.
Canva is super easy to use. The Pro version includes lots of royalty-free images. What’s more, you can easily duplicate your first carousel and just slot in new content for future carousels.
#1. Choose the correct document size in Canva
Open up a new Canva design and select either the preset called “Instagram Post”, or a size of 1080px x 1080px (both are the same size).
This will give you a perfect square, which is the best format for creating carousel posts.
#2. Choose the background color for your carousel
Canva lets you easily pick the background color for your slides. I normally select the same shade of blue that’s on my website, to keep the carousel on-brand.
You could also choose your own brand colors, or simply keep a simple plain white background. If in doubt, simple is always better.
#3. Create an eye-catching first slide
The first slide in your sequence acts as your cover page. It will be the first thing people see on your carousel. That’s why it needs to be eye-catching.
I like to put the title of the carousel in big chunky text, plus a small circular image of myself, and a couple of Canva graphics related to the topic of the carousel. I also include my website URL.
Here’s what it looks like.

#4. Build out the rest of your slides
Carousels work best when taking your readers through a set of tips, a how-to process, or a listicle.
Don’t overload the slide with too much information. For example, if I’m showcasing a how-to guide, I include one step on each slide, using a fun image to illustrate it and keep things interesting.

Also, avoid having big chunks of text on your carousel post. Bullet points work much better, or simply put one sentence on each slide. Less is more when it comes to carousels.
#5. Use Canva’s duplicate function to build out your deck fast
Canva’s duplicate page function is great for quickly creating all your slides while keeping the deck looking and feeling consistent.
Once you’ve created your first few slides, it should be easy to duplicate one of them for the rest of the deck (then just change the content as needed).
For example, if you’re creating a step-by-step guide, you can simply duplicate the first slide for all the others.
#6. Finish with a call-to-action
Don’t do all this hard work for nothing!
At the end of your carousel, don’t forget to include a call to action for whatever you want your audience to do next.
Bonus points if it relates to what they just learned from your carousel – they’re far more likely to engage. I normally encourage them to join my newsletter for more tips on SEO and profitable blogging.
#7. Download your carousel
So you’ve finished creating your carousel and you’re ready to post it on LinkedIn.
First you need to download it from Canva. Click the Share button in the top right-hand corner and select Download.
From the File Type menu, select ‘PDF Standard’ to download your carousel as a PDF document. This is the correct format for successfully posting a carousel to LinkedIn.
Once you’ve got your PDF, open it up and give it a final once over to make sure everything looks okay.
How To Post Your Carousel on LinkedIn
To post your carousel on LinkedIn, head over to your LinkedIn homepage and click ‘start a post’.
You’ll then need to click on the ‘Add a document’ icon at the bottom, as shown in the image below.
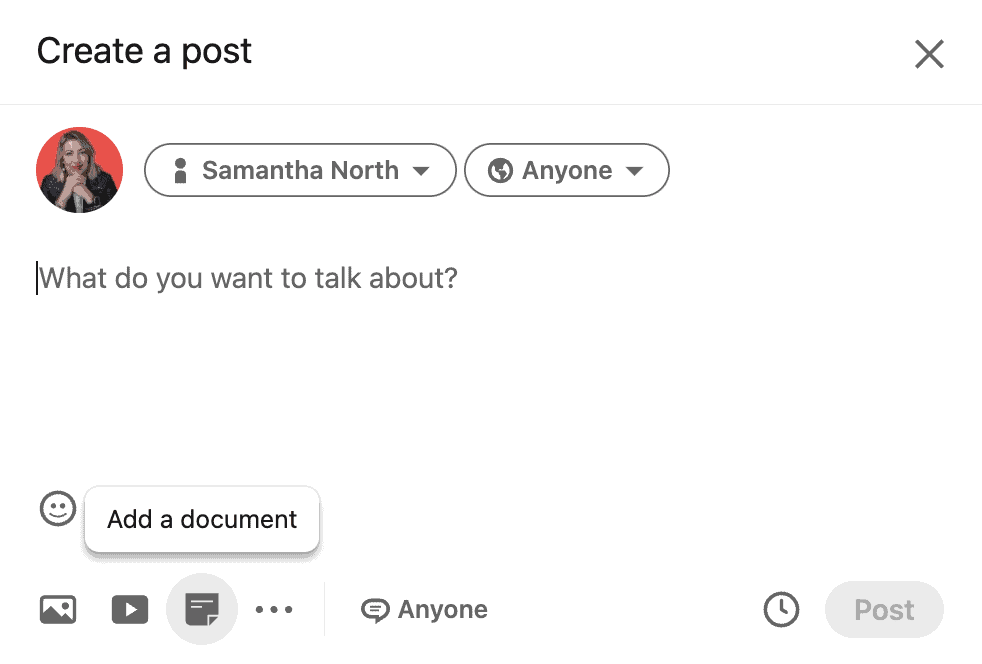
A dialogue box will pop up asking you to choose a file from your computer. Select your PDF documents and click upload.
LinkedIn will ask you to “Add a descriptive title to your document” – I normally just use the same title as I’ve used on the cover page of my carousel post. Then click Done.
Your final step before posting is to add a bit of accompanying text for the carousel. I like to write a brief hook of what it’s all about, and then add my three standard hashtags.
Typically, I also include a question in the accompanying text, to encourage more engagement from the audience. See below for one of my recent accompanying texts.

And that’s it. Hit Post to send your carousel to LinkedIn. You can also use the clock icon to schedule your carousel for later.
Once it’s posted, keep an eye out for any comments in the first 30 minutes or so. Make sure you reply to those quickly to boost post engagement in the early stages.
If you’ve hit the mark with your carousel, you should start seeing reposts and comments coming in thick and fast. Engage with the comments as much as possible to keep the engagement rolling.
Best Practices For Carousel Posts
- Highly visual – lots of images, photos and/or graphics.
- Fun and entertaining – the best carousels are highly engaging, even if they focus on an otherwise boring industry process. E.g. cartoon images often work better than boring graphs. Don’t be afraid to show your personality and have fun with your audience.
- Short chunks of text and bullet points.
- One key point per slide.
- Eye-catching first slide.
- Call to action on the last slide.
FAQs: LinkedIn Carousel Posts
Final Thoughts
LinkedIn carousel posts have been a game-changer for me on the platform. They’ve played a huge role in growing my follower base from around 2,000 to over 20,000 in just 18 months.
Carousels are also an excellent way to generate inbound leads and showcase your expertise in your industry.
And the great thing is, once you’ve built your first carousel post in Canva, it’s pretty easy to keep the template and simply slot in new content for each new carousel.
If you haven’t tried LinkedIn carousel posts yet, why not give them a try today!?


